Accounts
The Telegram accounts database in Multogram: how to add accounts (sign-in by phone number, ready-made session files, bulk import), what the columns and statuses mean, how to attach a proxy and open an account in the messenger.
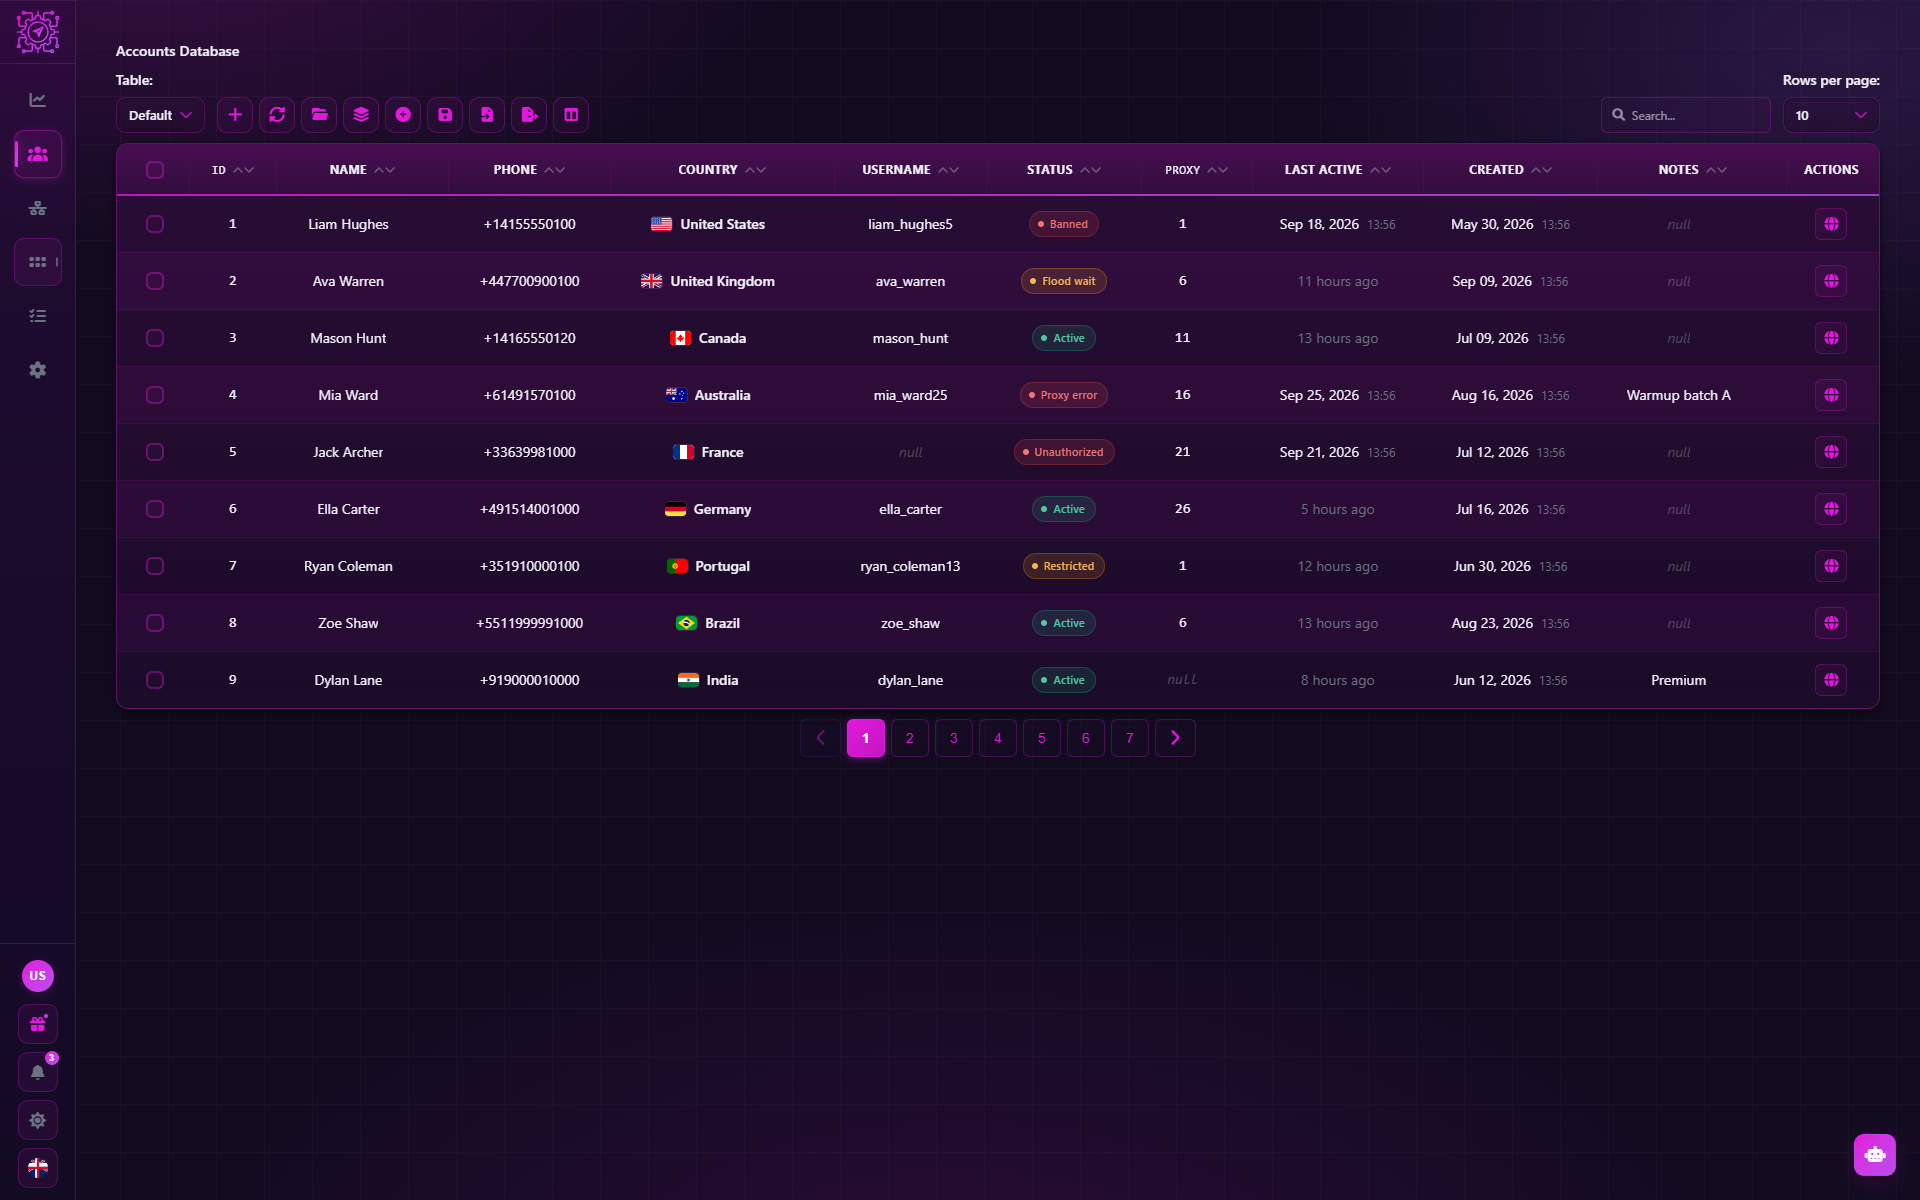
The Accounts tab is the database of your worker Telegram accounts. Every mode runs on accounts from here: when you create a task, you choose which of them take the work. While the database is empty there is nothing to run, so work almost always starts here.
The database is available on any plan, including the free Free plan. The plan does not limit the number of accounts.
How to add an account
Click + on the bar above the table — the Add Account window opens with three tabs. Pick one based on what you already have:
| Tab | When it fits | What you need |
|---|---|---|
| Manual | You have a phone number but no session files | The number and access to the sign-in code |
| Session | You have a ready .session and/or .json file | The number and the files |
| Bulk | You need to add many accounts at once | Session files or a list of lines |
Manual: sign-in by phone number
The application signs in to the account right now and creates a new session for it.
Fill in the form. The Phone number in international format (required), a Name for yourself (optional), and the Device — which phone to present to Telegram as: Random, Samsung Galaxy S24, Samsung Galaxy S23, Google Pixel 9 Pro, Google Pixel 8, Xiaomi 14 or OnePlus 12.
Choose a folder and a proxy. Save to folder — where to write the .session and .json files; if
left empty, the files go to the default sessions folder. A proxy is optional, see below.
Click Add and enter the code. Telegram sends a sign-in code — by SMS, to the Telegram app or with a call. The window waits for you to enter it. If the code didn't work, you can enter it again.
Answer the extra steps. Depending on the account, the window asks for the two-step verification password (2FA), an email and the code from the email. If the number is not yet registered in Telegram, the window offers to create an account: enter a first name (the last name is optional).
After sign-in a row with the Active status is added to the database, and the session files appear in the folder.
You can't enter the code in advance
The code is valid for a few minutes and arrives only during sign-in. Keep the phone or the account it will arrive on at hand, and don't close the window until the sign-in is finished.
Session: ready-made files
Adds an account you already have files for. The application does not sign in to Telegram in this case.
| Field | What to enter |
|---|---|
| Name | A label for yourself. Optional |
| Phone | The account's number. Required |
| Session file (.session) | The path to the session file |
| Session data (.json) | JSON file — the path to the file with device parameters. Or Enter manually: Device, Locale, Timezone, App version |
| Attach a proxy | Optional |
At least one of the two files is required. It is better to give both: .json stores the device parameters the
account is used to signing in with, and without them Telegram sees a "new device".
Such an account enters the database with the Unauthorized status: the session has not been checked yet. This is normal — the status updates at the first check or the first run.
Bulk
Two ways, which can be combined:
- Select .session / .json files. You can select many files at once. Files with the same name
(
79001234567.sessionand79001234567.json) are merged into one account, and the file name becomes the phone number. - Paste a list. One account per line in the
phone;name;session_pathformat — the name and path are optional. A JSON array of accounts works too. The Import list button loads the list from a file.
+79001234567;Account 1;C:/sessions/79001234567.session
+79007654321;Account 2
+79005550000
All accounts added this way get the Unauthorized status. To find out right away which of them are alive, select them and run the Check accounts mass action.
Account proxy
A proxy is attached to an account when it is added — the Attach a proxy switch — and is then used in all of this account's tasks.
- From table — pick a proxy saved on the Proxies tab. This is more convenient: the proxy is stored once, and its state is visible in the proxies table.
- Manual — enter the type, host, port, login and password, or paste the whole line, for example
socks5://user:[email protected]:1080. The application parses the line itself and shows what it recognised. Such a proxy is stored only with this account and does not appear on the Proxies tab.
You can change or remove the proxy later in the Proxy column, or for many accounts at once with the Proxy mass action.
Table columns
| Column | What's in it | Editable |
|---|---|---|
| Title | Your name for the account | Yes |
| Phone | The phone number. Required and unique: there can't be two rows with the same number | No |
| Country | Detected from the number. Can be set manually; Detect from number restores the automatic value | Yes |
| 2FA password | The account's cloud password, if known. Hidden behind asterisks | Yes |
| First name, Last name, Username | The Telegram profile. Updated when the account is checked | No |
| Session file | The path to the .session file | No |
| JSON data | The path to the .json file or the device parameters entered manually | No |
| Status | The account's state, see below | No |
| Proxy | The proxy's number from the proxies table, or a connection string | Yes |
| Last active | When the account last worked | No |
| Created | When the account was added to the database | No |
| Notes | Any notes: what the account is for, what was done with it | Yes |
The 2FA password is worth filling in: the Security mass actions and account export use it.
Account statuses
The status answers one question — can you work on this account right now.
| Status | What it means | What to do |
|---|---|---|
| Unchecked | The account has never been checked | Run Check accounts |
| Checking… | A sign-in to the account is happening right now | Wait for the result |
| Active | The account works | Ready to use |
| Unauthorized | Added from files, the sign-in has not been checked yet | Check the account |
| Restricted | The account has a spam restriction | Check the term with Check restrictions and let it rest |
| Flood wait | Telegram has temporarily limited the rate of actions | Wait and slow down your tasks |
| Invalid session | The session is no longer accepted: the account was signed out or the session was terminated | Sign in again via Manual |
| Banned | The account is banned by Telegram | Take it out of work |
| Deleted | The account has been deleted | Remove it from the database |
| Proxy error | Could not connect through the account's proxy | Check or replace the proxy |
| Error | Another sign-in error | Look at the task log and check again |
The status updates by itself: when an account is added, during a bulk check, when a task starts and when the account is opened in the messenger.
Working with the table
On the bar above the table:
| Button | What it does |
|---|---|
| + | Opens the Add Account window |
| Refresh | Reloads the table |
| Mass actions | Opens actions on the selected accounts |
| Create / load / save database | Working with the database file (.db, .sqlite) |
| Import Data | Loads rows from CSV (with a header) or JSON |
| Export Data | Exports to CSV or JSON — all rows or only the ticked ones |
| Filter Columns | Hides columns you don't need |
The table also has search, sorting by column, row selection with checkboxes and a choice of rows per page.
Several tables in one database. The Table switch picks a table inside the database file, and + Create New Table adds a new one. This is a handy way to split accounts into pools: for example, fresh and warmed-up. New accounts from Auto Registration are written into the table you pick when creating the task.
The globe icon in an account's row opens that account in the built-in messenger.
Recommendations
- Check accounts after importing. The Check accounts mass action shows in one pass which sessions are alive, and fills in the name, username and country.
- Keep the
.jsonnext to the.session. The device parameters from.jsonare part of the account's "fingerprint". Without them every sign-in looks to Telegram like a sign-in from a new phone. - One account, one proxy. Telegram links many accounts on one IP address together and restricts them faster.
- Make backups. Save the database file and the sessions folder. Deleting a row from the table does not delete the session files from disk.
- Keep fresh accounts separate. Keep new accounts in a separate table and don't put them straight on mailings and inviting.
Common questions
Where do I get session files?
Session files are created when you sign in to an account: via the Manual tab, in the
Auto Registration mode or in another program. Other formats — for example
the tdata folder from Telegram Desktop — are converted by the Converter.
Why is an imported account "Unauthorized"?
When importing from files the application doesn't sign in to Telegram, so it doesn't know whether the session is alive. Select the accounts and run Check accounts — the status becomes Active or shows the problem.
Can I add an account without files, by phone number only?
Yes, via the Manual tab. You need access to the sign-in code Telegram sends during sign-in.
How many accounts can I add?
As many as you like — the plan does not limit the size of the database. The only limit is how many tasks and threads your computer and proxies can handle at once.
Does deleting a row delete the session file?
No. Only the database record is deleted; the .session and .json files stay on disk.
Why can't I add an account with a number that is already there?
The phone number is the database's unique key. If an account with that number already exists, update its row instead of adding a new one, or keep the second copy in another table.
Updated
Glossary
Plain explanations of the words used in Multogram and Telegram: session, tdata, pool, thread, task, coordinator, module, scenario, resource, MCP, FloodWait, spam block, proxy, 2FA, invite link, spintax, prompt, device slot and more.
Mass actions
Actions on many accounts from the database at once: checking accounts and spam restrictions, changing the profile, the 2FA cloud password and ending other sessions, attaching proxies and exporting accounts as .session + .json or ZIP.